Sunday, July 11, 2010

Gumbo

A while back I saw Alton Brown make gumbo on an episode of Good Eats and decided to put it on my to-do list of things to try since I was in a food rut and wanted to try some new flavors. Unfortunately, I've never had the pleasure of visiting the area of the country around New Orleans, and none of the local restaurants in my part of the country has decent gumbo. I'm not quite sure what gumbo is supposed to taste like, but all specimens I've had have been flavorless and boring. I believe California's "let's try to make everything more healthful" mentality is a contributing factor. So other than buying a plain ticket to New Orleans, my other option was to try making it myself.

My boyfriend had spent many Mardi Gras's in New Orleans in his youth and has more experience in eating gumbo than I or anyone I knew, and I wanted his help. Unfortunately, all the help he gave me was that I should find a good recipe and follow that. For soups and stews, I usually don't like following recipes and can't judge a good one just from reading it anyway, so I decided to wing it. The goal was for the gumbo to taste "good," and I think it came out pretty good. When my boyfriend tried it, he was quite annoyed that I had nailed the flavor without knowing what gumbo is supposed to taste like nor following a recipe so that was a bonus because I wasn't really aiming for authenticity of flavor.

 In any case, here is a rough description of what I did:

Ingredients:
1 pound of thick cut applewood smoked bacon, cut into small pieces
About 1 pound of shell-on shrimp, peeled and de-veined.
About a haf cup of all-purpose flour
Two chicken breasts cubed (I happened to have these on hand)
2 green bell peppers, chopped
1 large onion diced
2 garlic cloves
Some okra
Sassafras
Toasted garlic and toasted garlic oil
Fish Sauce
Bay leaf
Salt

1. Crisp the bacon in a dutch oven and remove it. Leave the drippings in the dutch oven and mix in the all purpose flour. Yes, you need ALL those drippings; don't remove ANY of it. The mixture of fat and oil is called a roux. I also added in a couple cloves of garlic to infuse into the roux. I removed it when it started to turn golden brown. I mashed the garlic cloves and set them aside.


2. Cook the roux over low heat until it changes color. According to Alton Brown, it's supposed to be brick red and gives gumbo its characteristic flavor. I had never done this before, and chickened out when it got pretty dark brown. Next time I'll be more brave in letting it go darker.

3. While the roux is darkening, make a broth with the shrimp shells. Heat about a quart of water in a saucepan until boiling and add the shrimp shells. For those of you who don't know me, I'm fanatical about "clean" broths and stocks so I skimmed off all the scum, foam and other smelly things that float to the top. I let this simmer for about 20 minutes, skimming off the scrum the whole time to make sure that it doesn't redesolve back into the broth and make it cloudy and smelly. Don't forget to stir and watch the roux. When the shrimp broth is done, drain out the shells and return the broth back to the saucepan. Heat it to a boil, add a pinch of salt and fish sauce and add the shrimp a bit at a time to cook. Cooking the shrimp in the shrimp broth will make both items more flavorful. Don't overcook the shrimp -- remove them and set aside as they finish cooking. Remember to remove all scum that forms in the broth while the shrimp are cooking.


4. After all the shrimp are cooked, add the cubed chicken to the broth to cook a bit at a time in the shrimp broth. Again, take out all the scum that floats to the top of the broth as the chicken cooks since it will release its own protein impurities. Cooking the chicken in the shrimp broth will make the chicken flavorful and the broth more flavorful as well. Remove the chicken cubes as they finish cooking and set aside.

5. When the roux is finished, add the chopped bell peppers and onions, cook for a bit over med/high heat and then add the shrimp/chicken broth. When heated through, add the bacon, mashed garlic, shrimp, chicken, crispy fried shallots, and toasted garlic and garlic oil and let simmer for a few minutes.

6. To serve, ladle into bowls and top with toasted garlic oil and sassafras to taste.


Crispy bacon:


Bacon drippings:


Bacon drippings and flour


Roux starting to develop color


More color


Hotel Chocolate. The Purist. Milke 52% With Vanilla and Cocoa Nibs. Menevava Plantation. Madagascar


After months and months of not eating any chocolate (I was getting an allergic reaction) I had my first taste of it again a few days ago. I picked a good one to start the habit again -- Hotel Chocolate's "The Purist" a 52% milk with cocoa from the Menavava Plantation in Madagascar.

This is a milk chocolate bar that I absolutely love, which quite surprised me since I have tried many milk chocolate bars only to hate them. Until I tried this bar,  the only other milk chocolate bar I liked was the Amedei milk. I think I may like this more than the Amedei milk. This chocolate smells like cocoa butter and vanilla which perfectly foiled with the darker scent of cocoa solids. The flavor was amazing. It was quite rich, creamy with delightfully bitter cocoa nibs that acted as the perfect foil to sweet milk chocolate.

 Am I just over-excited because it's been more than 6 months since I've eaten chocolate? Perhaps . . . . But I've heard the feedback from people whose taste I trust that this is, indeed, a very delightful bar.

Saturday, July 10, 2010

Nocino 2010

It's that time of year again when green walnuts are in season. I am making nocino again this year. Here is this year's recipe:


1 liter Sobieski Vodka
20 green walnuts cut in half
1 orange peel, most of the pith removed
3 cinnamon sticks


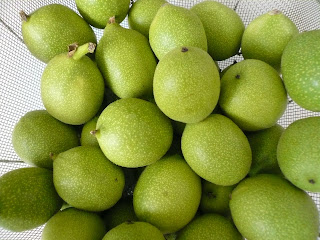
Freshly picked, beautiful green walnuts washed and ready to go:


 Everything just mixed:


Here is the mixture on day 2. It's starting to turn green. By day 4 it looks completely black and there's little point in taking a picture. It smells divine, though.

Canh Chua

One of my favorite soups is canh chua -- a delicious soup that's flavored with tamarind (me in Vietnamese). My uncle Chu Nghia is a fantastic cook and I have him to thank for the keys to a deliciously aromatic canh chua:

Tamarind fruit is a delicious sour/sweet fruit common in southeast Asian cooking. You may recognize its flavor from certain Asian candies and pad thai.

For canh chua, I suggest you buy a block of seedless tamarind pulp. Despite its name, seedless tamarind pulp is not seedless and often has bits of tamarind shell. To prepare it, mix the tamarind pulp with about a cup of boiling water. Stir it around, break up the pieces, and let it sit for at least an hour.


 Then strain out the seeds, shells, and any large pieces of fiber. You'll want to press through the strainer with a spoon to get as much liquid and pulp extracted as possible.

You'll be left with real seedless tamarind pulp. 


Ingredients in the soup:
Fresh chicken broth (nuoc ga tui)
Tamarind Pulp (bot me)
Tomatoes (ca chua)
Chayote (trai su su)
Bean sprouts (gia)
Catfish
 Toasted garlic -- very important!
Optional -- bamboo, greens, etc.


Bamboo and Tofu

My mom made this dish when we had dinner with my uncle's vegetarian girlfriend. Bamboo is one of my favorite vegetables -- it has a fantastic texture and a slightly bitter/neutral flavor which I love. This is by far one of my favorite vegetarian dishes.

Start with shallots and oil:

Once the shallots are aromatic, add shredded bamboo:
Once the bamboo are heated through, add julienne deep fried tofu (see my post on bi chay for the technique), some chopped garlic, soy sauce, and sliced red onion and turn off the heat once everything is heated through.


Finally, fold in some bean sprouts which will slightly cook from the residual heat.

Bi Chay

Bi chay is the vegetarian version of a Vietnamese mixture of shredded pork, pork skin, and toasted powdered rice. I am not a fan of the meat version, but I do love the vegetarian version which I first tried when my Aunt Bac Chi made vegetarian spring rolls in honor of my uncle's new girlfriend, a Buddhist vegetarian. Toasted rice powder gives this its distinctive flavor. I use bi chay as a filling for spring rolls and sandwiches.

 Take firm tofu, slice it thinly and microwave it for about a minute or so until it's hot. Then deep fry it until golden brown and delicious. Microwaving the tofu first is a trick that my Aunt Bac Lan taught my mom -- it makes the tofu puff up beautifully when being deep fried so that the texture doesn't get all heavy and greasy. After the tofu is fried, drain it and cut into long thin strips. Add in some shredded jicama and toss while the tofu is still warm and add toasted rice powder to taste.


Tuesday, March 2, 2010

Green Garlic


In mid-October last year, the first rain of the fall season had arrived. I remember waking up early to get ready for work, but decided that I would much rather curl up with a blanket, drink hot chocolate, and stay home.

A dear friend of mine had informed me that it was time to plant garlic. Her directions were simple:  place a clove of garlic (don't remove the paper) into the ground. Cover the garlic with just a bit of soil -- don't bury it too deeply

Now it's March, and the rain hasn't let up yet, but my garlic have sprouted! I can't wait to eat them all.

Amedei Tasting


I bought this assortment of Amedei chocolates at Cardullo's when I was in Boston last year. Each package came with four tasting squares. Here are the package notes and my (very brief) notes

Ecuador 70 % -- Intense aroma of forest undergrowth and cacao. A chocolate to surprise you as its immense aromatic flavour develops
My notes: Very pleasant clean earthy scent with red fruit aromas. Flavor is well balanced though finish falls a bit short.

Venezuela 70% -- Flora aroma with dried fruit sensations. A balanced chocolate with a pleasant aromatic richness
My notes: Smells a bit sharp -- like cheese and tart red fruit. Flavor is mellow and coffee-like

Trinidad 70% -- Aroma of toasted cacao and tobacco. A classic chocolate with a hint of walnut
My notes: Aroma is similar to Venezuala but brighter and fruitier. Flavor is creamy and rich. Nice finish of caramel and coffee.

Grenada 70% -- Aroma of exotic spices. A creamy and pleasantly balanced chocolate.
My notes: Scent reminds me of pho (star anise, and coriander). Flavor starts out a bit weak and ends a bit chalky-tasting.

Jamaica 70% --  Intense aroma, mediterranean fruit flavours. A highly captivating, decise, and powerful chocolate
My notes: Scent is smoky and minty and reminds me a bit of sauvignon blanc. Flavor is caramel-ly, smoky, and a little flat.

Roti Canai


I have been obsessed with making roti canai ever since I first tried it at Layang Layang, a Malaysian restaurant in San Jose, CA. I experimented with many recipes but could not duplicate the flaky-but-tender layers of this Malaysian flat bread. I tried using buter, canola oil, and clarified butter to no avail. Finally, I succumbed to using margarine (Yech!) which has produced the best results so far. Next time I will try this recipe using ghee and report how it turns out.

The recipe below comes from Shiok, a book by Terry Tan and Christopher Tan


Ingredients:
500 grams (1 lb 2 oz) plain flour, sifted
1 tsp salt
1 tsp sugar
125 mL (1/2 cup) lukewarm water
4 T lukewarm milk
150 grams (5 and 1/4 ounces) vegetable ghee or melted margarine
Makes 12-14 roti canai
Cooking time: 4 minutes per roti canai
Prep time 40 min plus 45 min standing time

1. Combine flour salt and sugar in mixing bowl. Mix water, milk, and 2 T of margarine with hands and knead gently but constantly for about 7 minutes adding more water or flour as necessary for a soft coherent dough. Pinch off pieces the size of large plums and shape into balls. Roll balls in remaining margarine to coat and place on plate. Cover with plastic wrap and let stand in cool place for 45 minutes

2.Have a frying pan set at ready over medium high heat

3. Lightly grease work surface or large chopping board. Place dough ball on it and dab with more melted margarine. Flatten and stretch dough outwards.

4. Fold two opposite edges to center and then other two edges to make square.

My notes:
I took “plain” flour to mean “all purpose” flour
Stretch dough out by putting it on a greased surface and massaging it out
Let dough rest after stretching and shaping before you cook it.
This recipe produced decent layers and flakiness, but the flavor wasn't particularly interesting. Perhaps using ghee will improve the flavor

Roti Dough Balls


Stretching the dough out


Folding


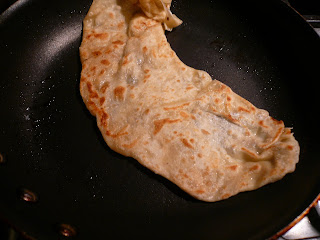
Cooking
 

Served with a curry dipping sauce
 

Salt Preserved Citrus

I came across a bounty of meyer lemons and oranges and decided to preserve some with salt using a Moroccan recipe.  It's fantastic with chicken, tuna salad, and tomato sauce. I also added some to a ratatouille dish I made. My mom also says that there are Vietnamese drinks that use salt-preserved citrus for flavor but I haven't tried that yet.

Preserved Lemon


Preserved Orange

Ingredients:
10 meyer lemons
1/2 cup kosher salt

Directions
1. Quarter the meyer lemons but don't cut all the way through so they remain attached at base.
2. Take a quartered meyer lemon and squeeze its juice into a jar and rub kosher salt into the flesh.
3. Place the salted lemon into the jar with the lemon juice.

4. Repeat with remaining lemons and salt being sure to squish the lemons into the jar so they're packed tightly. Ideally, the jar would have no airspace when you're finished. If airspace remains, fill it up with more lemon juice or try to squeeze in another lemon or two.

5. Let jar sit for a few weeks before using.

For the preserved oranges, I followed the same steps but used oranges instead.

Valentine's Day 2010

Braised short ribs with cauliflower puree, braised celery, and julienne leeks


Short Ribs:
Marinated in malaysian curry powder, five spice powder, white vinegar, balsamic vinegar, palm sugar, honey, soy sauce, garlic, shallot, fish sauce, tamarind paste.

Browned ribs, then add water to cover and let braise for 1.5 hours with celery. Strain out the liquid, add one diced Asian pear, palm sugar, honey, rice wine vinegar and cook until pears are soft. Puree the mixture and put it back on the heat to bubble away until it's significantly reduced.

Julienne leeks -- butter, salt, leeks.

Cauliflower puree -- butter, cream, crispy shallot (hanh phi)

Friday, January 8, 2010

Deep Fried Shallots

Vietnamese Deep Fried Shallots (aka Hanh Phi)


I love deep fried shallots and always have some on hand. They add a very nice crunchy, savory flavor when used as a topping for grilled salmon, casseroles, and salads. In Vietnamese cuisine, they're also eaten with glutinous rice, broken rice, and "burnt" rice (com chay in Vietnamese) which is the burnt rice found at the bottom of the rice pot if you cook it "incorrectly."

Deep fried shallots have a wonderful flavor. There's no sulfurous, biting, sharp edge and they're not sweet like they would be if you cook them low and slow. I think they're fantastic stirred into soups and simmered for a few minutes. I also save the cooking oil which my family uses for making fried rice. I also use it to drizzle onto rice and soup.

Deep fried shallots add a very distinctive rich, savory flavor. When I'm making a soup, and it tastes like it's "missing something" I'll add deep fried shallots which impart a lot of deep umami flavor without my having to resort to MSG (which I don't use in my cooking) or meat (which I don't always have a spare piece on hand).

I often see directions for making deep fried shallots in cookbooks and other websites, but I think it's much more helpful to have pictures of the process along the way because this is more about recognizing what to look for than following a recipe. The first few times I made these, I waited until the shallots were a beautiful golden brown before I drained it. This is a mistake because the shallots continue to cook while they're drained and by the time they cool off, they're acrid and bitter. Then I made the mistake where I ended up accidentally making the shallots soft and mushy because the heat of the oil I used was too low. The onions ended up sweating rather than frying -- I added chicken broth and made an impromptu onion soup which didn't taste bad-- but it wasn't what I was looking for. Don't be afraid of high heat.

Directions:
1. Peel and thinly slice shallots
2. Heat some vegetable oil in a dutch oven or saucepan.
3. When the oil is hot, put the sliced shallots in and stir. There should be lots of bubbles and vigorous activity in the saucepan. If the shallots aren't "dancing" around much, the oil's temperature is too low and you'll need to turn up the heat.
4. When the shallots are ready (see pictures below), drain them and let cool.


 Pick out some shallots


Trim and peel 
 

Thinly slice 


After oil has heated up add the sliced shallots. There should be a lot of bubbles as the water from the shallots boils off. If you're new to frying, don't be afraid of all the noise. It's normal. Just don't put your eyeballs close to the action.


Continue to let the shallots cook. After a few minutes, you'll see some pieces that are starting to tan. 


Gradually more and more of the shallots will change color. Here, the mixture between the purple shallots and the tan shallots is about 50/50.


Continue to let them cook a bit more.


When it looks like this, drain it. I know that not all of the shallots have tanned up yet, but they'll continue to cook as you drain them.


Here they are freshly drained and a bit shiny from the oil. They are still cooking a bit at this point so don't worry about some of those pale guys -- they'll tan up in a few minutes.
 

After a few minutes of cooling, they start to dry and crisp up and finish


 Golden, brown, and delicious!